Custom API
If you do not want to use the official Breezell quota, or if you want to use your own API key, you can configure a custom API provider in the Breezell settings page.
This allows you to connect Breezell to your own model provider, custom gateway, API key, and model name.
Open the Breezell settings page
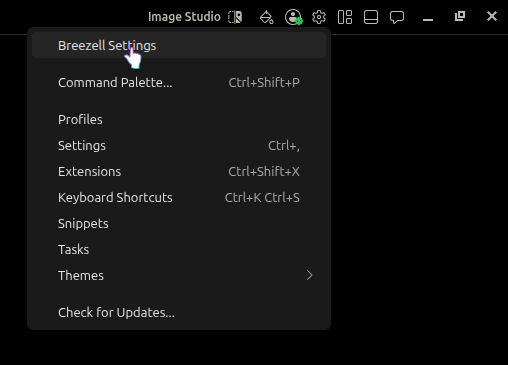
To start, find the settings icon in the top-right area of the editor.
The settings icon looks like a small gear icon and is located near the other toolbar icons.
Click the settings icon to open the settings menu.
At the top of the menu, click Breezell Settings.
After clicking Breezell Settings, the Breezell settings page will open.
Go to the Models page
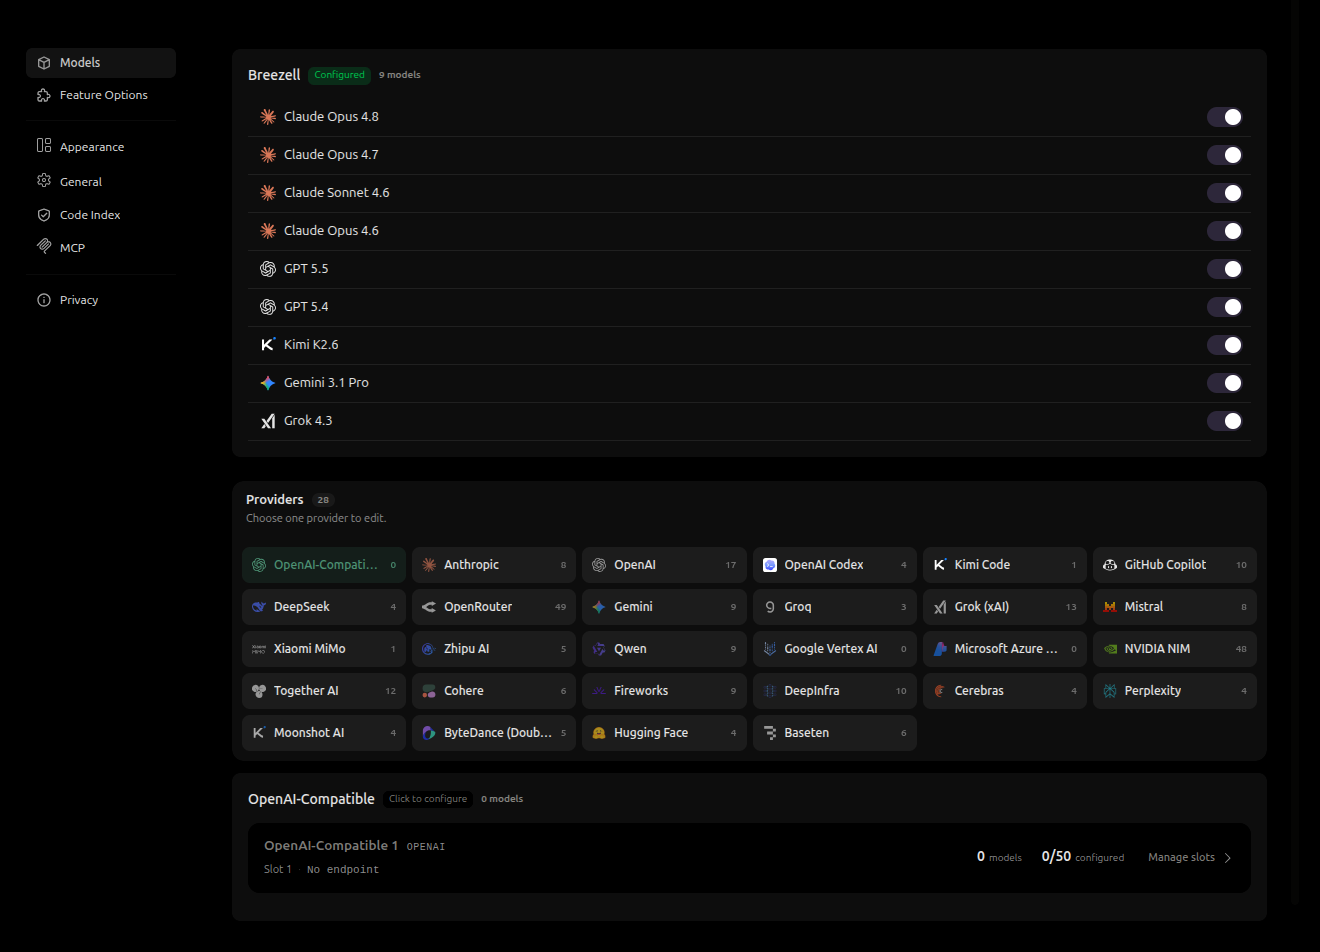
After opening Breezell settings, you will usually enter the Models page by default.
If you are not on this page, look at the left sidebar and click Models.
The Models page is where you can manage available models, official models, third-party providers, and custom API providers.
On this page, you will see several enabled models at the top, such as Claude, GPT, Gemini, Kimi, and Grok models.
Below the model list, you will see the Providers section.
Choose a provider
Breezell supports many different model providers.
For example, you can find providers such as:
- OpenRouter
- Anthropic
- OpenAI
- OpenAI Codex
- Kimi Code
- GitHub Copilot
- DeepSeek
- Gemini
- Groq
- Mistral
- Qwen
- Google Vertex AI
- Microsoft Azure
- NVIDIA NIM
- Together AI
- Cohere
- Fireworks
- DeepInfra
- Cerebras
- Perplexity
- Moonshot AI
- ByteDance
- Hugging Face
- Baseten
Each provider may have different configuration methods.
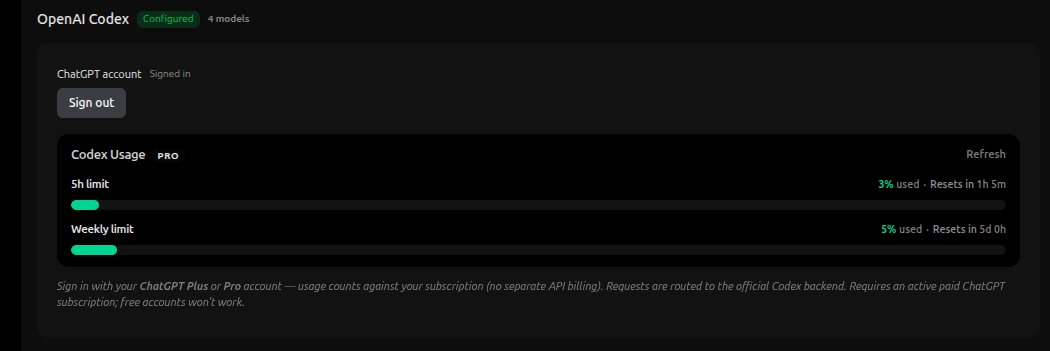
For example, if you are using OpenAI Codex, you can choose OpenAI Codex from the provider list and sign in directly with your ChatGPT account.
After signing in, Breezell can route Codex requests through the official Codex backend. This option does not require a separate API key.
Use OpenAI-Compatible for a custom API
If you want to use a third-party API or a self-hosted API gateway, choose OpenAI-Compatible.
This is the default custom API provider.
Unlike fixed providers, OpenAI-Compatible allows you to configure your own connection details manually.
You can set information such as:
- Provider nickname
- Base URL
- API key
- Protocol
- Endpoint preset
- Model name
- Custom headers
This makes it suitable for custom gateways, third-party API platforms, proxy services, or OpenAI-compatible model providers.
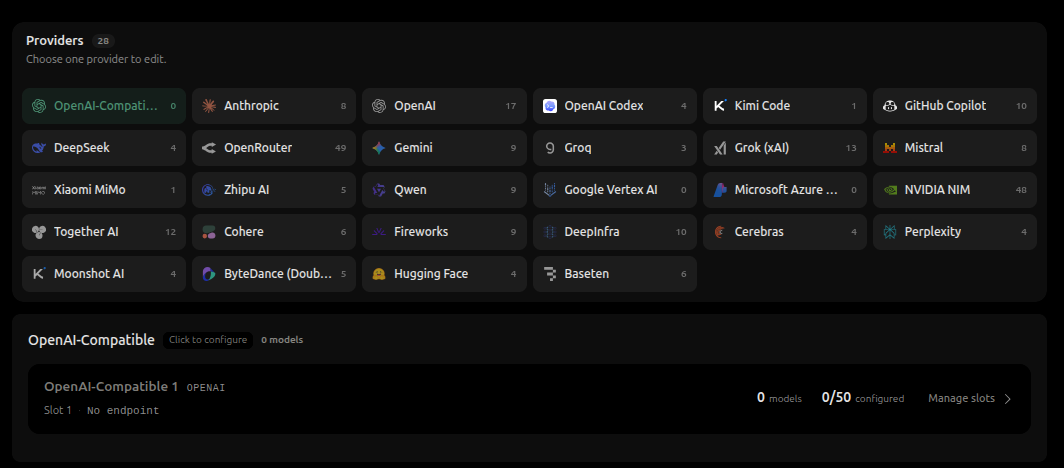
Open the custom API configuration panel
In the OpenAI-Compatible section, find the default slot.
It may appear as OpenAI-Compatible 1.
You can click the slot area or click Manage slots on the right side.
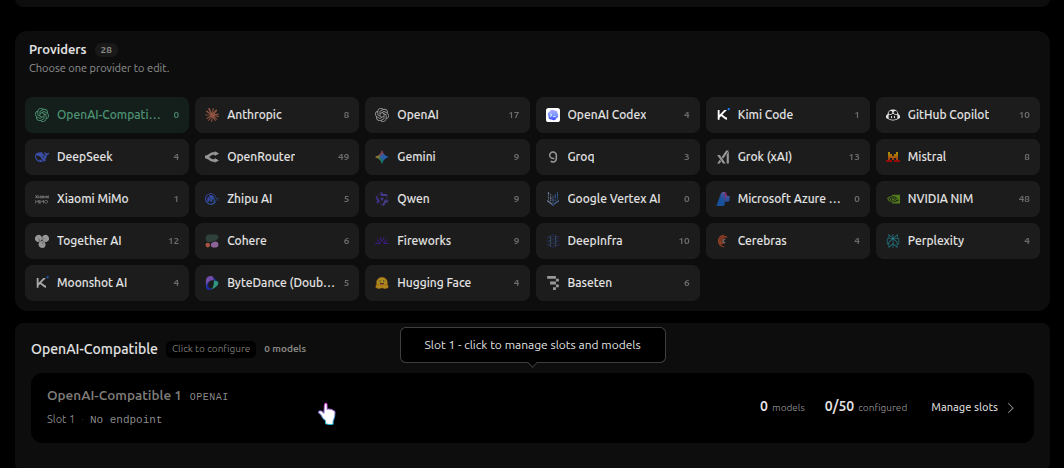
This will open the custom API configuration panel.
Inside this panel, you can configure the connection, authentication, protocol, endpoint, and available models for your custom API provider.
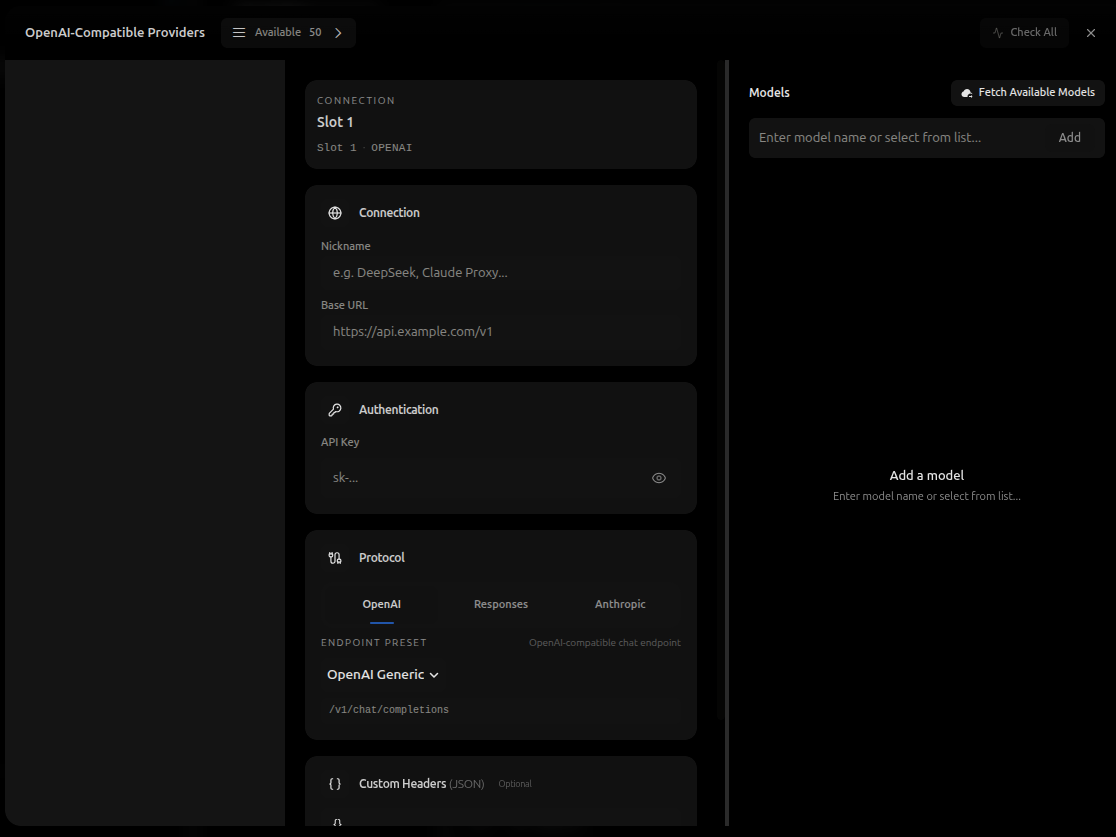
Manage provider slots
At the top-left of the OpenAI-Compatible Providers panel, you will see an Available selector.
This selector shows the available custom API slots.
Breezell supports up to 50 OpenAI-Compatible provider slots. Each slot can be configured as an independent custom API channel.
For example, you can use different slots for different providers, gateways, API keys, or model groups.
Click the Available selector to open the slot list.
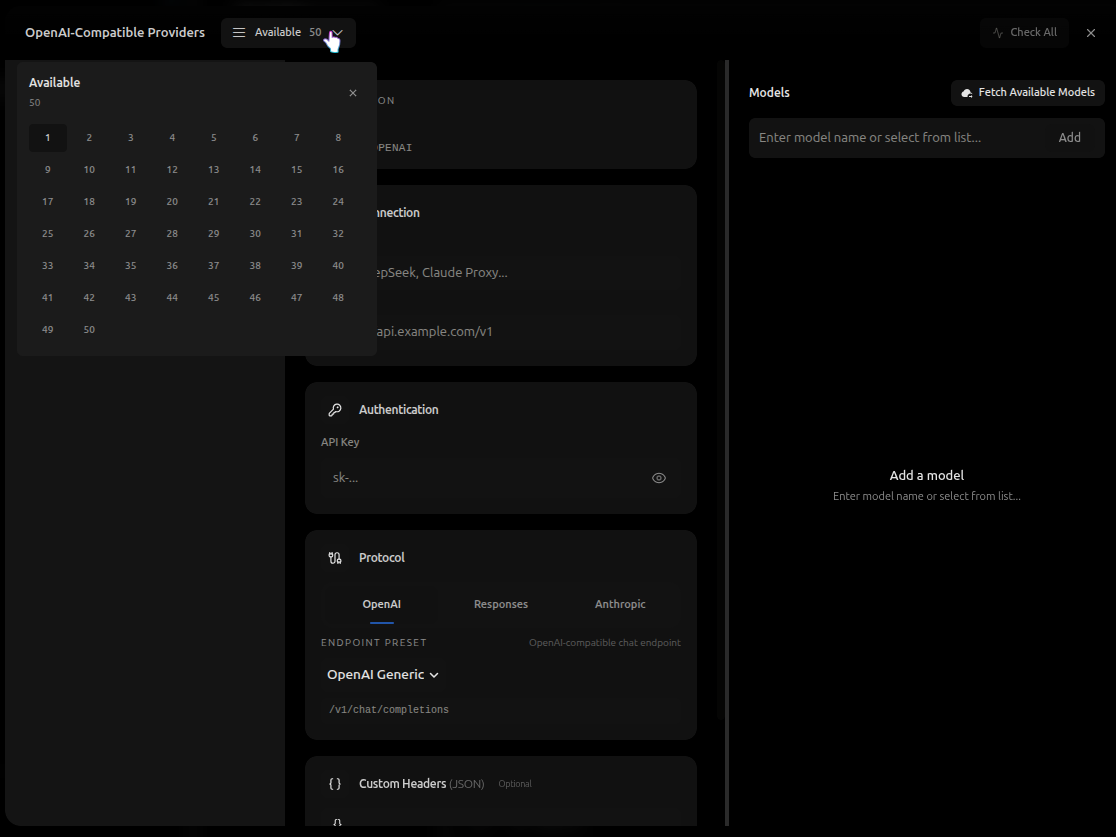
You will see slots numbered from 1 to 50.
If you are currently configuring Slot 1, you can select Slot 2 to configure another custom API channel.
After selecting another slot, the configuration panel will switch to that slot. You can then enter a different provider name, Base URL, API key, protocol, endpoint, and model list for the new channel.
Configure the connection
Return to the main configuration panel.
In the Connection section, you can configure the basic connection information for this custom API provider.
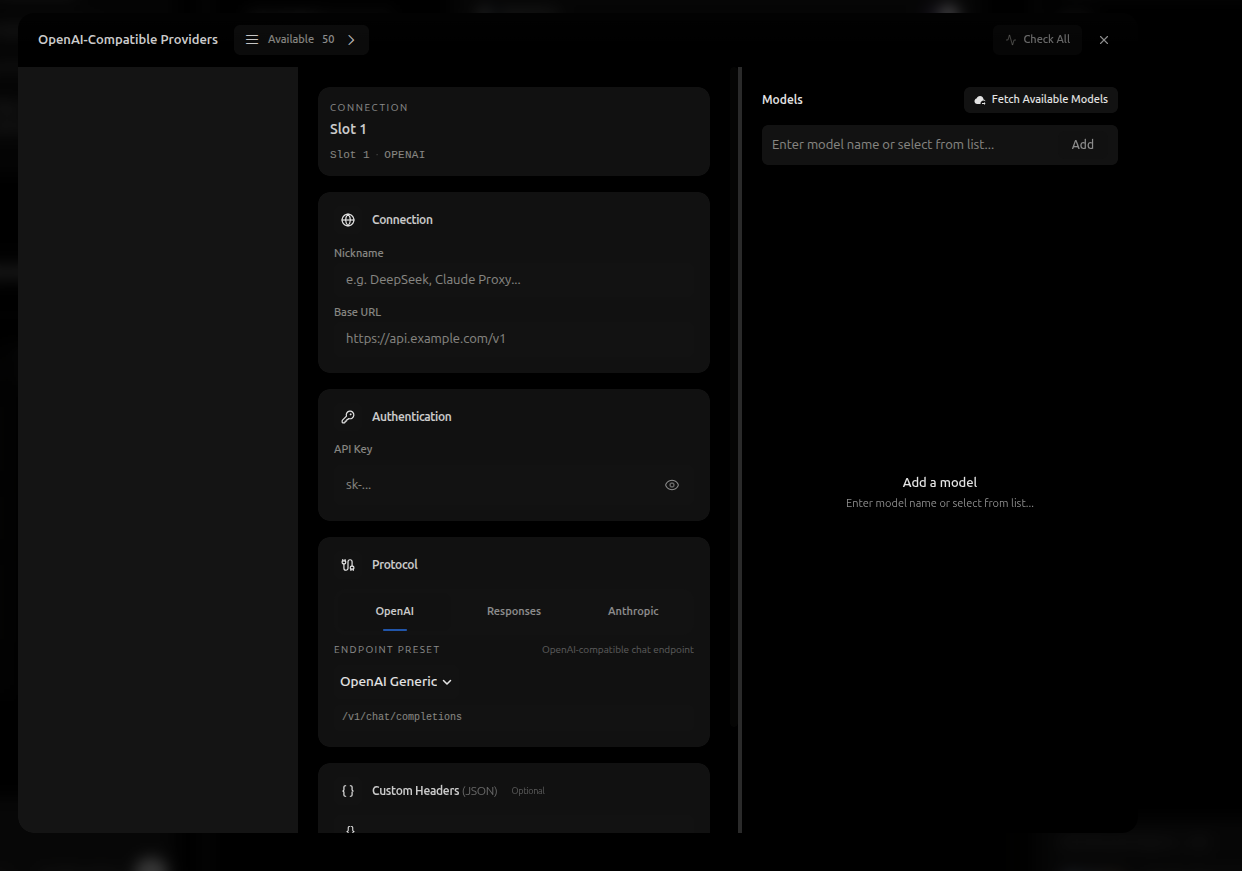
You can set:
- Nickname
- Base URL
- API Key
- Protocol
- Endpoint preset
- Custom headers
- Model names
The Nickname is used to identify this custom provider. You can enter a name such as the provider name, gateway name, or any label that helps you recognize this channel.
The Base URL is the API gateway address.
The Base URL must start with either:
http://or:
https://For example:
https://api.example.com/v1or:
http://127.0.0.1If the Base URL does not start with http:// or https://, the request may fail.
Check the final request URL
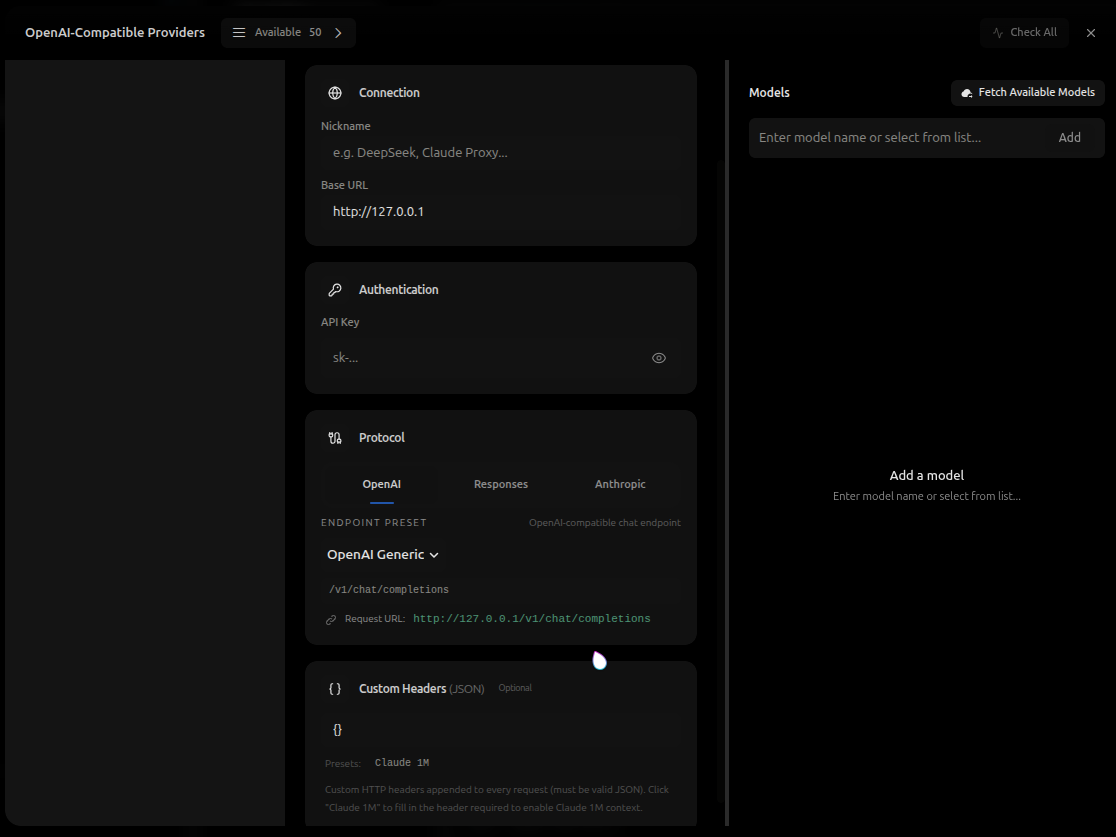
After entering the Base URL and selecting the endpoint preset, check the generated Request URL shown below the protocol section.
This area shows the final request address that Breezell will use.
For example, if your Base URL is:
http://127.0.0.1and the endpoint preset is OpenAI Generic, Breezell may generate:
http://127.0.0.1/v1/chat/completionsYou should carefully confirm that the final Request URL is correct.
This is important because different providers may define their gateway URLs differently.
Some providers require the Base URL to include /v1, while others only require the root domain.
For example, one provider may require:
https://api.example.com/v1while another provider may require:
https://api.example.comIf the provider uses a non-standard gateway format, the automatic endpoint completion may not work correctly.
This can cause the final request path, such as /v1/chat/completions, to be duplicated, missing, or incorrectly combined.
Before saving or using the provider, always check the generated Request URL and make sure it matches the API documentation from your provider.
Select the request protocol
In the Protocol section, choose the request protocol that matches your provider.
Common options include:
- OpenAI
- Responses
- Anthropic
For most OpenAI-compatible third-party APIs, select OpenAI.
If your provider uses the OpenAI Responses API, select Responses.
If your provider or gateway expects Anthropic-compatible requests, select Anthropic.
Choose the protocol according to the API format required by your provider. If the protocol does not match the provider, requests may fail even if the Base URL and API key are correct.
Choose the endpoint preset
Protocol selection is very important because it determines whether your model can be requested correctly.
Even when a provider says it is compatible with the OpenAI API, the actual request path may still be different from the official OpenAI API specification.
Some providers modify the standard endpoint structure. Breezell has adapted many of these provider-specific variants.
Click the endpoint preset dropdown to view the available presets.
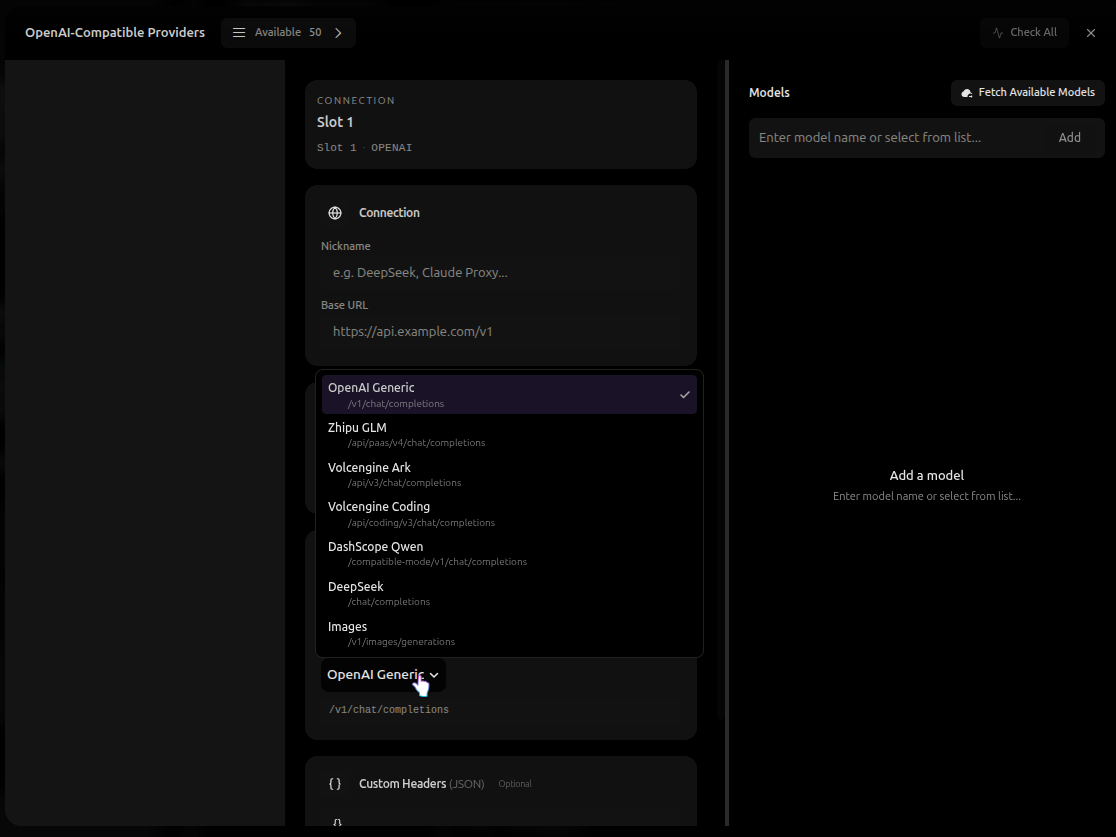
You may see options such as:
- OpenAI Generic
- Zhipu GLM
- Volcengine Ark
- Volcengine Coding
- DashScope Qwen
- DeepSeek
- Images
Each preset represents a different request path.
For example, OpenAI Generic may use:
/v1/chat/completionsOther providers may use different endpoint paths, such as:
/api/paas/v4/chat/completions/api/v3/chat/completions/compatible-mode/v1/chat/completions/chat/completionsSelect the endpoint preset that matches your provider.
If you are not sure which preset to use, check the API documentation from your provider and compare the final Request URL shown in Breezell.
If your provider uses a format that Breezell has not adapted yet, please contact us so we can add support for that provider.
Configure custom headers
The Custom Headers section is optional.
Use this section only when your provider, gateway, or proxy service requires additional HTTP headers.
Custom headers are appended to every request sent through the current custom API slot.
The value must be valid JSON.
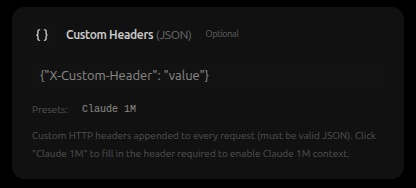
For example:
{
  "X-Custom-Header": "value"
}You can use custom headers for provider-specific requirements, such as:
- Special routing headers
- Organization or project headers
- Proxy authentication headers
- Beta feature headers
- Long-context feature headers
If your provider does not require custom headers, you can leave this section empty or keep it as an empty JSON object.
{}Make sure the JSON format is valid.
Use double quotes for both keys and values. Do not use comments, trailing commas, or single quotes.
Correct example:
{
  "X-Provider-Mode": "compatible"
}Wrong example:
{
  'X-Provider-Mode': 'compatible',
}Below the custom headers field, Breezell may provide preset shortcuts.
For example, the Claude 1M preset can automatically fill in the header required to enable Claude 1M context support.
If your provider documentation requires a specific header, copy that header into this section and confirm that it is valid JSON before sending requests.
Fetch and add available models
After you finish configuring the connection information, click Fetch Available Models on the right side of the panel.
Breezell will try to request the provider and load the available model list.
If the request succeeds, the available models will appear in the model selection list.
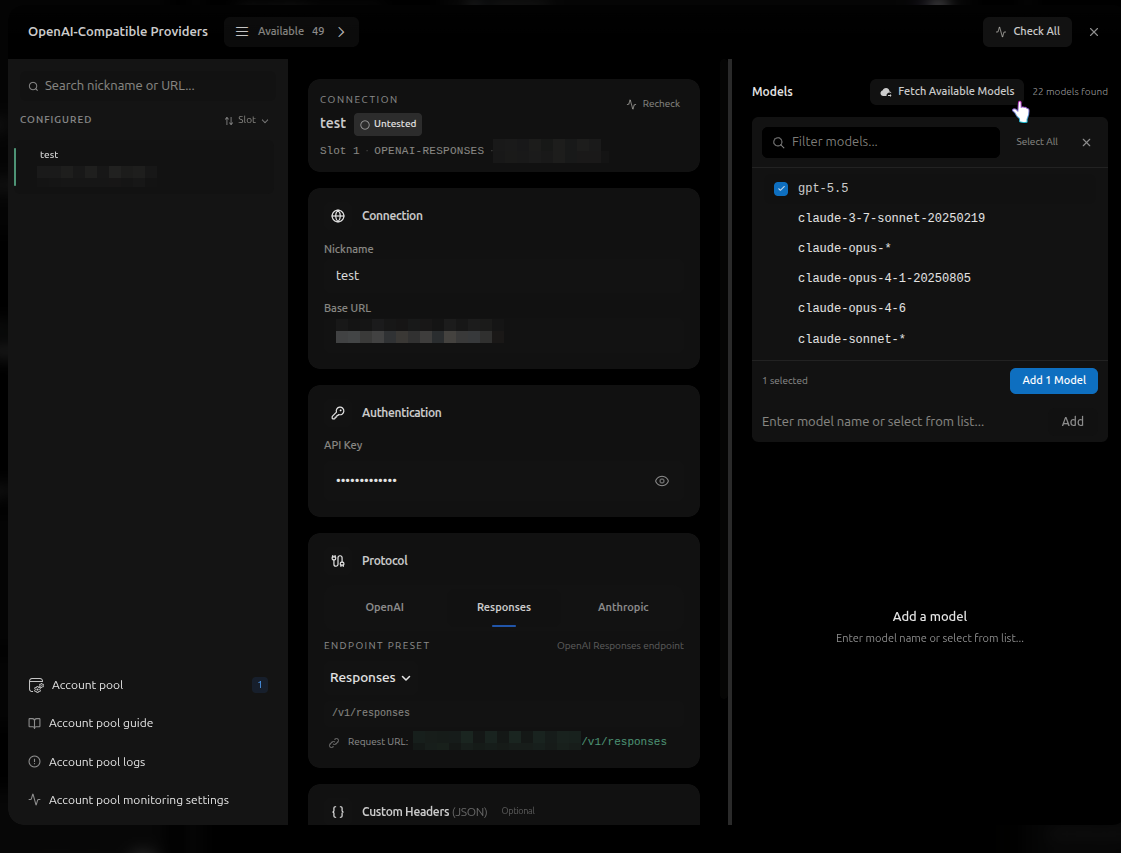
After you confirm that the provider settings are correct, you can click this button to fetch and select your own models.
You can then select the models you want to use and click Add 1 Model.
For example, you can select a model such as:
gpt-5.5Then click Add 1 Model to add it to the current custom API provider.
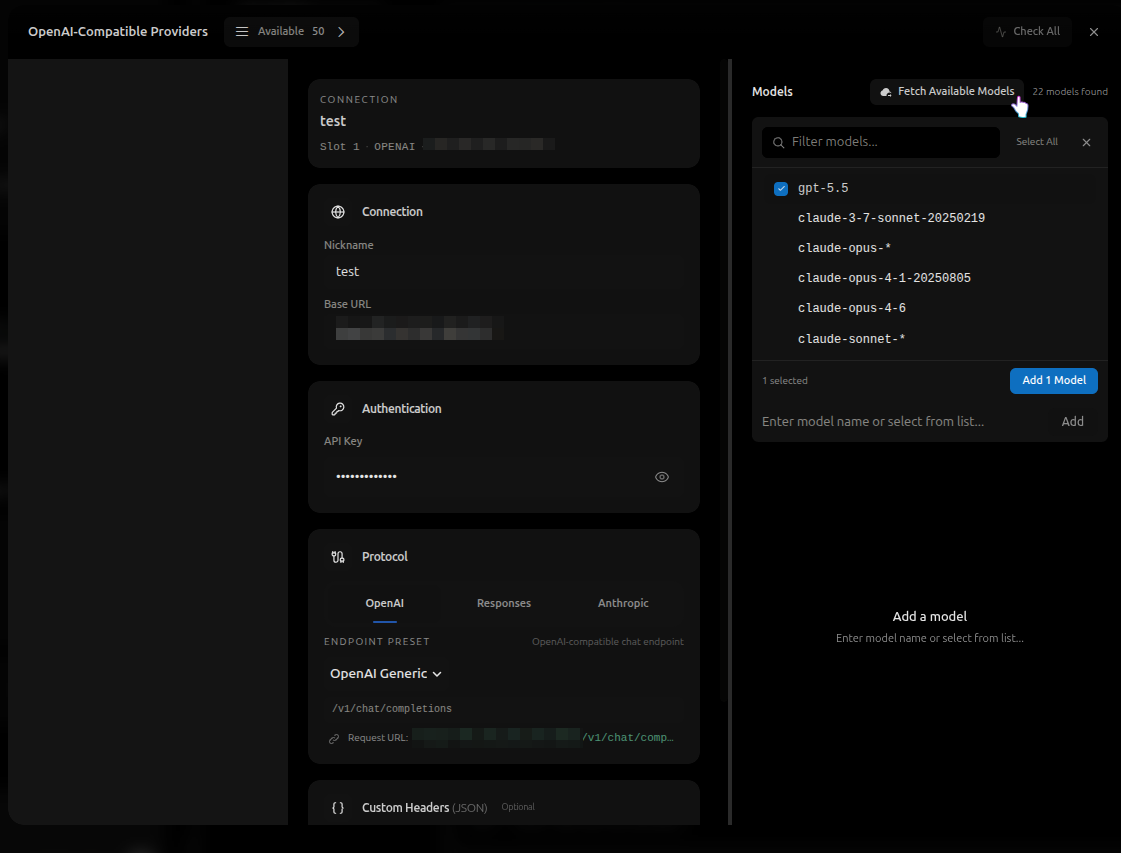
If the left area is still empty at this step, restart Breezell and try again.
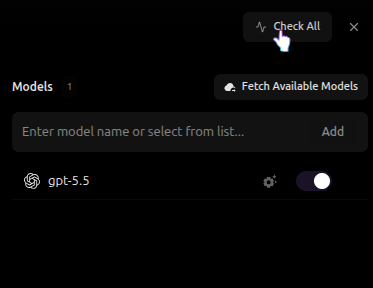
You can also use Check All to test whether the gateway connection is healthy after configuring the provider and trying to load models.
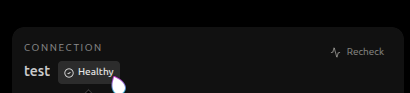
If the check succeeds, the connection card can show a status such as Healthy. You can also use Recheck to test the gateway again after changing the configuration.
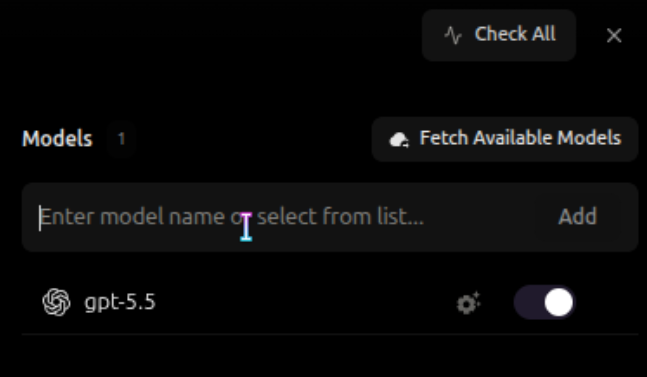
Add a model manually
You can also add a model manually.
In the model input field, enter the model name provided by your API provider.
Then click Add.
This is useful when the provider does not expose a model list endpoint, or when the model you want to use is not returned by Fetch Available Models.
Make sure the model name is exactly the same as the model ID required by your provider.
Enable, disable, or delete a model
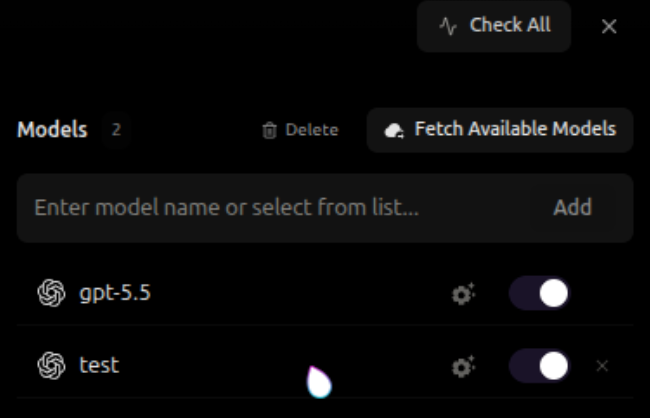
After adding models, they will appear in the Models list.
Each model item can be managed individually.
You can use the switch on the right side of the model item to enable or disable the model.
When a model is enabled, Breezell can use it for requests.
When a model is disabled, Breezell will keep the configuration but will not use that model.
Move your mouse over a model item to show more actions.
You can delete a model by clicking the delete button.
Use this when you no longer want the model to appear in the current provider.
Open advanced model settings
If you want to configure more detailed behavior for a model, click the settings button on the model item.
This opens the Advanced Settings panel.
Advanced settings are optional. Most users do not need to change them unless they understand the model limits and request format required by their provider.
Advanced Settings
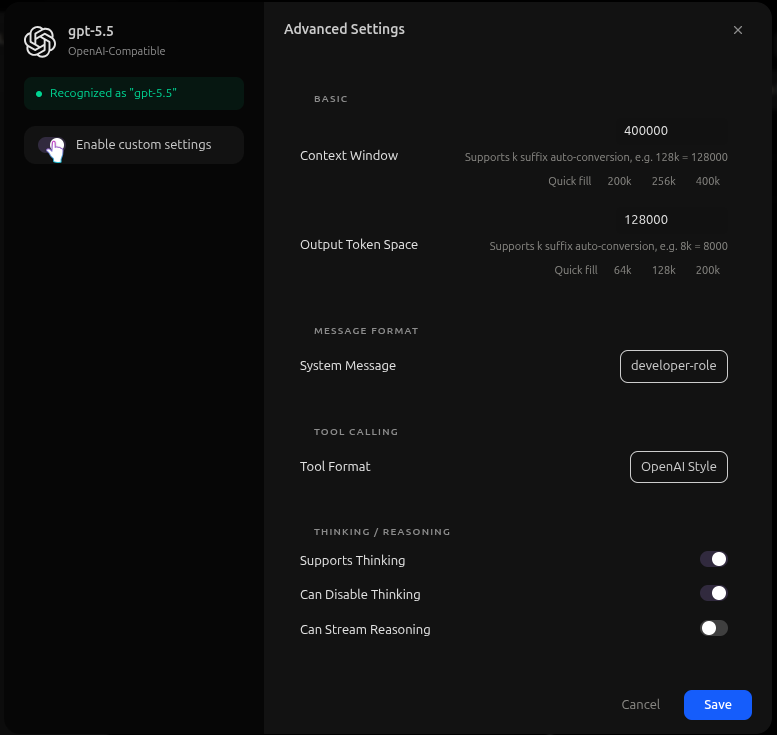
In the advanced settings panel, you can customize model-level behavior.
Enable custom settings
The Enable custom settings switch controls whether this model uses its own advanced configuration.
If this switch is disabled, Breezell will use the default recognized settings for the model.
If this switch is enabled, the values in the advanced settings panel will override the default behavior for this model.
Context Window
Context Window defines the maximum context length supported by the model.
This usually means the maximum number of tokens the model can process in one request, including conversation history, system messages, user messages, tool results, and other context.
For example, a value like:
400000means the model is configured with a 400k context window.
The field supports k suffix auto-conversion.
For example:
128kwill be converted to:
128000Use the value provided by your model provider. Setting this value too high may cause request failures if the model does not actually support it.
Output Token Space
Output Token Space defines the maximum output token space reserved for model responses.
For example, a value like:
128000means the model can reserve up to 128k tokens for output.
This also supports k suffix auto-conversion.
For example:
8kwill be converted to:
8000Use a value that matches the real output limit of your provider.
System Message
System Message controls how Breezell sends system-level instructions to the model.
Some models expect the system message to use a standard system role.
Other models may expect a different role format, such as a developer role.
If your provider requires a specific system message format, select the matching option here.
If you are not sure, keep the default setting.
Tool Format
Tool Format controls how tools are described and sent to the model.
For OpenAI-compatible models, use OpenAI Style.
If the provider requires a different tool calling format, select the format that matches the provider documentation.
Incorrect tool format settings may cause tool calling to fail.
Supports Thinking
Supports Thinking indicates whether the model supports reasoning or thinking mode.
Enable this only when the model provider supports this feature.
Can Disable Thinking
Can Disable Thinking indicates whether Breezell is allowed to disable thinking mode for this model.
This is useful for models that support both reasoning and non-reasoning modes.
Can Stream Reasoning
Can Stream Reasoning indicates whether the model can stream reasoning content during generation.
Only enable this if the provider supports streamed reasoning output.
If the provider does not support it, enabling this option may cause request errors or incomplete responses.
Save advanced settings
After changing advanced settings, click Save.
If you do not want to apply the changes, click Cancel or close the panel.
Only change advanced settings when you know the correct values for your model. Incorrect context size, output token limit, message format, tool format, or thinking settings may cause the model to behave incorrectly or fail to respond.
Select your custom model
After adding and enabling your custom model, return to the chat interface.
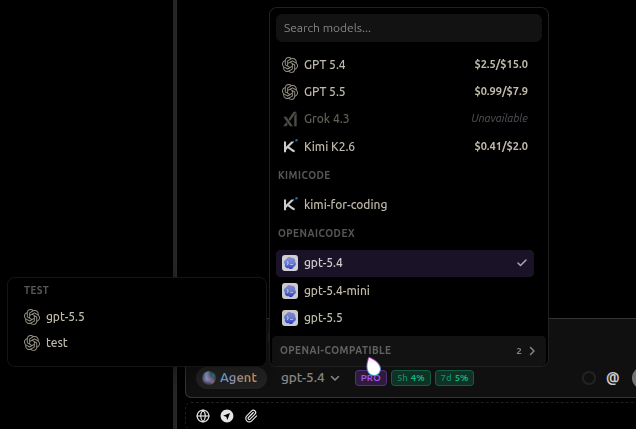
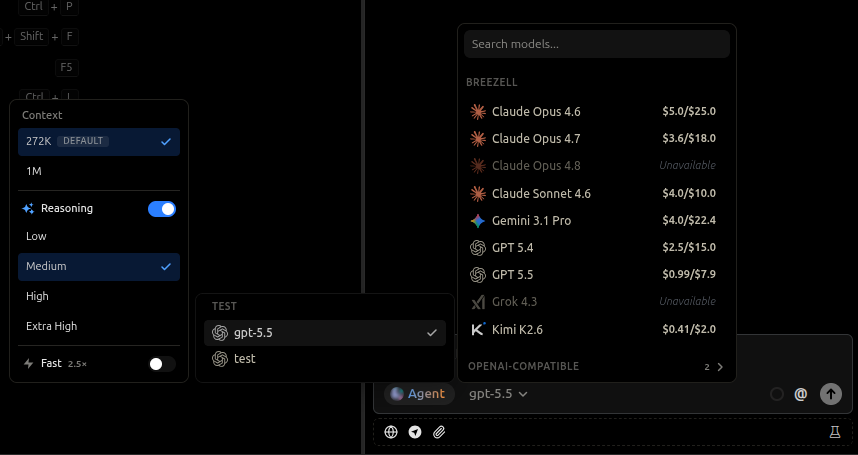
Click the model selector near the input box.
In the model list, you will see the built-in Breezell models, Codex models, and your custom OpenAI-Compatible models.
Your custom provider will appear under its own provider group. For example, if your provider nickname is TEST, the models you added under that provider will appear in the TEST group.
Select the model you want to use.
If you added multiple models, choose the one that matches your current task.
Adjust context and reasoning options
After selecting a model, you can open the model options panel.
In this panel, you may see options such as:
- Context size
- Reasoning mode
- Reasoning strength
- Fast mode
The Context option controls how much conversation history or input context the model can use.
The Reasoning option controls whether reasoning mode is enabled.
If reasoning is enabled, you can choose the reasoning strength, such as:
- Low
- Medium
- High
- Extra High
Higher reasoning strength may be useful for complex coding, planning, debugging, or analysis tasks.
Lower reasoning strength may be better for simple questions or faster responses.
If the model supports Fast mode, you can enable it to prioritize faster response speed.
The available options may be different depending on the model and provider you selected.
Start a conversation
After selecting the model and adjusting the options, type your message in the input box.
Then send the message to start a conversation.
For example, you can enter:
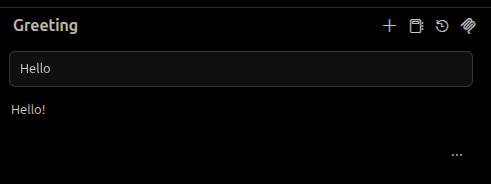
HelloIf the custom API is configured correctly, Breezell will send the request through your custom provider and return the model response in the chat.
You have now completed the custom API setup.